Buildroot for a more reliable Pi
Wednesday, 16 July 2025
This article is about using Buildroot to create more reliable firmware for Raspberry Pi-based embedded systems.
The context is a home automation system that also handles network infrastructure tasks. Split between several Raspberry Pi devices, the system has been in place for about twelve years now, and many extensions have been added during that time.
In another recent article, I wrote about pico-wifi-settings, my library for managing WiFi connections on Raspberry Pi Pico devices. That project is still ongoing, and there have been some newer versions already. In order to provide an example of the use of the library in a real project, I shared the source code and design details of my ventilation system controller, which is based on a Pico 2 W. The relative ease of managing the software for that project has inspired improvements in the rest of the system.
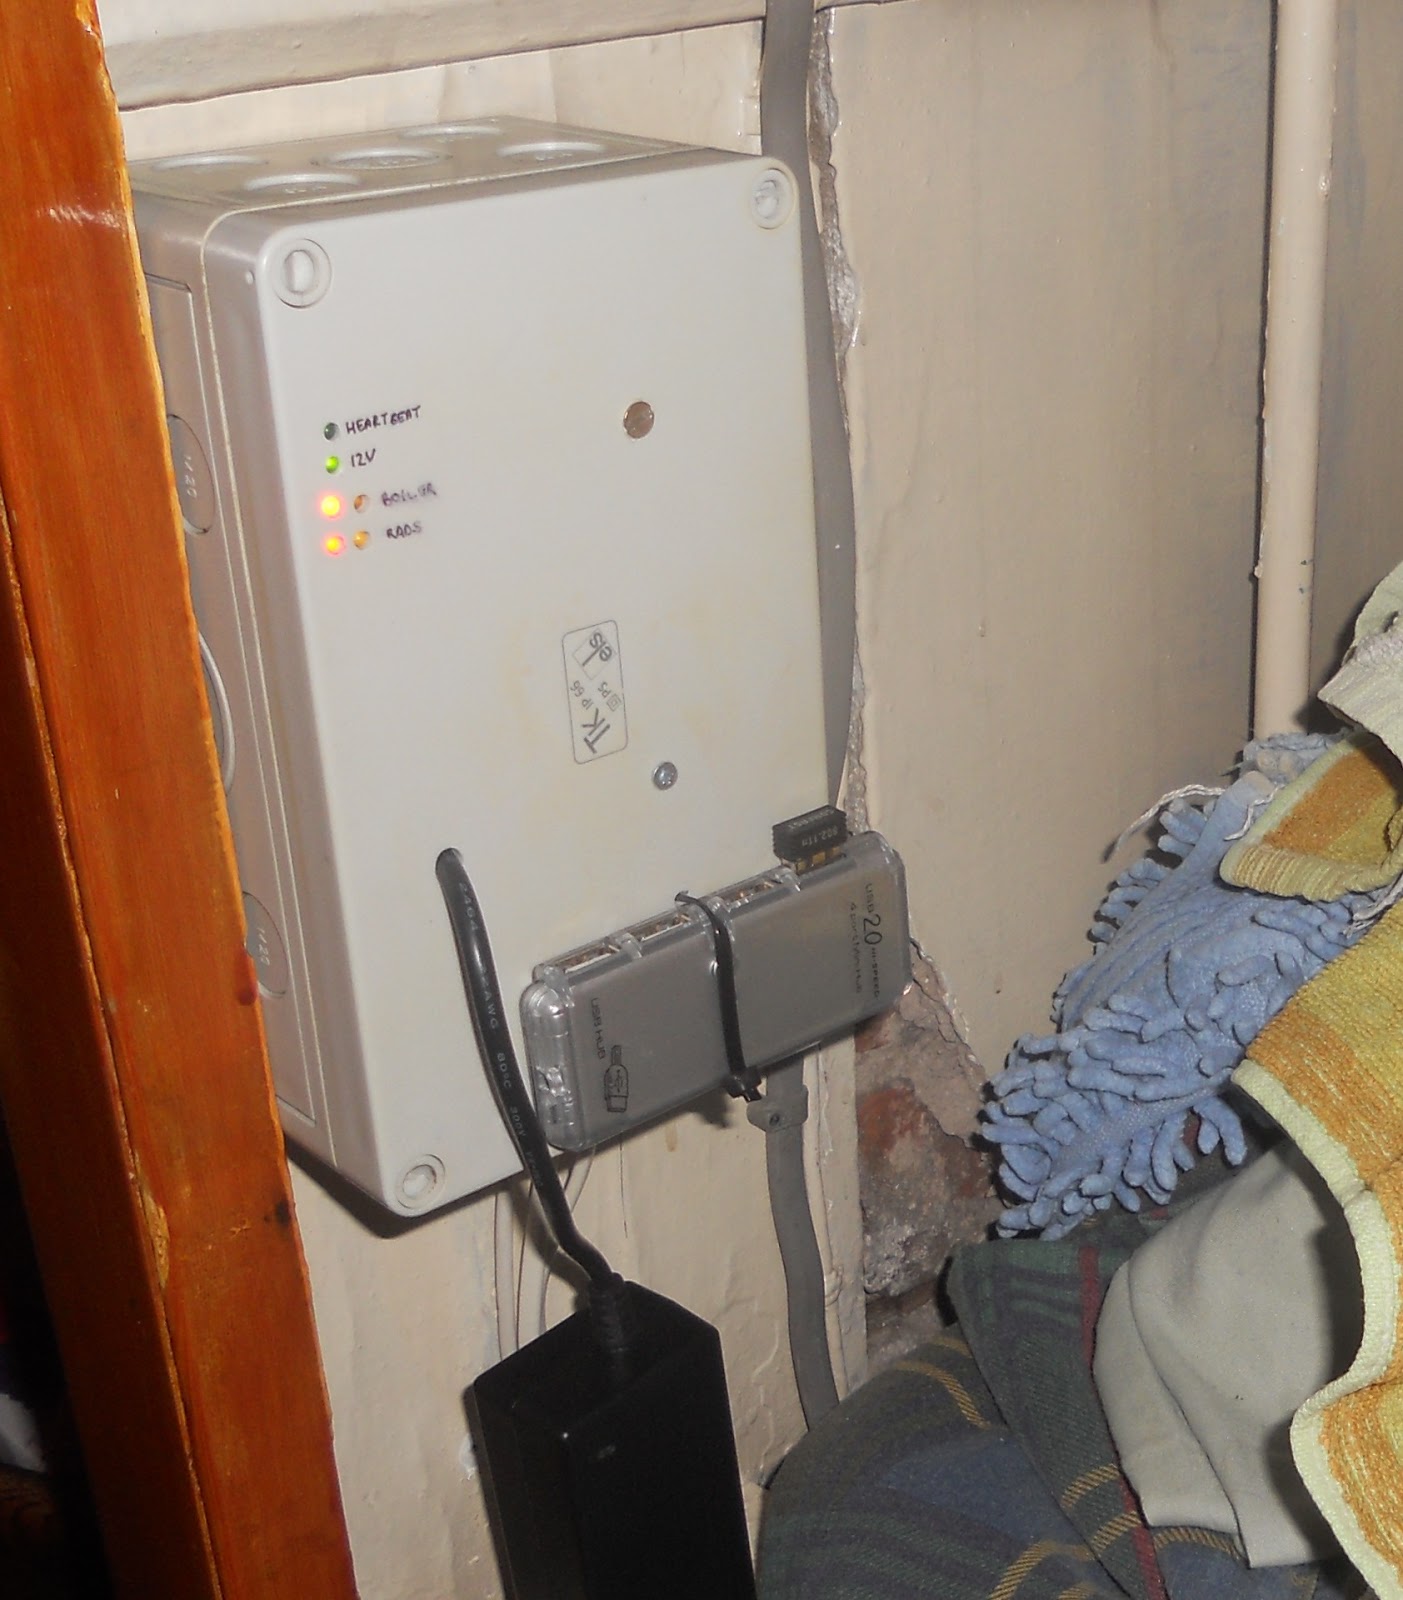
The first parts of the home automation system date back to 2013, when it was confined to this small box:
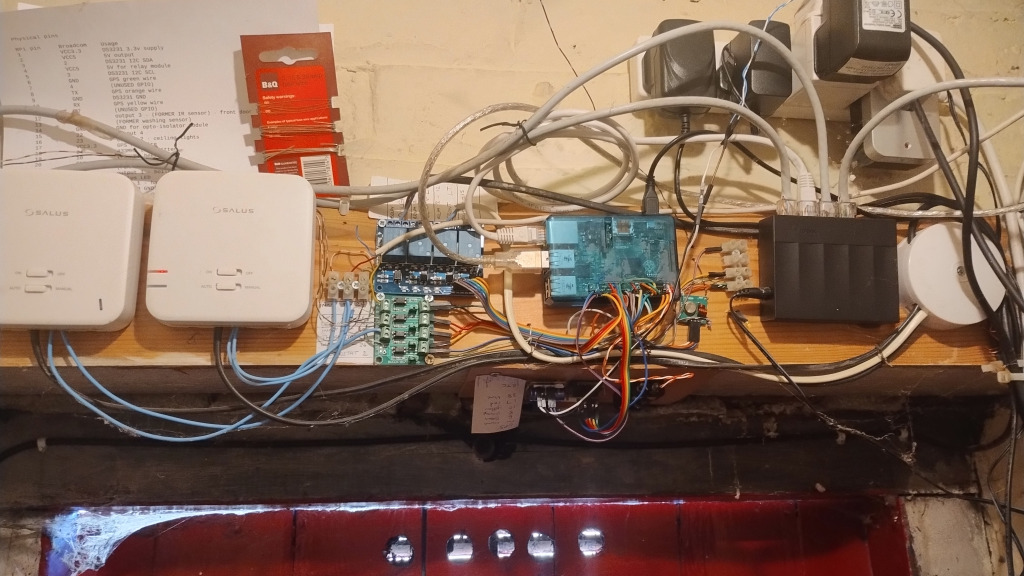
Since 2013, many features have been added. The system controls lighting as well as heating, using 433MHz radio signals and also Hue lighting via the REST API on a Hue hub. There are audio controls too, integrated with my S/PDIF dynamic range compressor. There is monitoring for two Internet connections using keepalived, along with monitoring for hot water and electricity usage. Now, four Raspberry Pi devices are in use, plus the Pico 2 W in the ventilation controller. Here is one of them, in the centre of the heating system controller:
The design has changed as I have gained experience:
- The 2017 update moved the components onto a wooden panel, addressing the problem that it was hard to do any maintenance on components that are squashed into a small box.
- I started to use DuPont cables to connect everything, rather than soldering my own connectors - the system is much easier to rewire and components can be easily disconnected for maintenance or replacement.
- Another reliability improvement was the move to wired Ethernet (don't rely on WiFi unless you are forced to).
- Originally the 433MHz subsystem used a custom kernel module but this became unnecessary thanks to pigpiod which is able to transmit and receive Raspberry Pi GPIO signals with microsecond-accurate timing. Now, no custom modules are required. This was very helpful when adding support for additional 433MHz protocols, because it was only necessary to extend the Python program which uses the "pigpio" module (these parts are in their own Github project).
But these were relatively minor changes. When the original system was built in 2013, I was concerned about the impact of a power failure, and I wanted to be able to recover from any problem by "turning it off and on again". So, I arranged for Linux to boot up with a read-only root filesystem which would only be made read-write temporarily for maintenance. But maintenance proved difficult. The system did not work well with the package manager, the kernel was long out of date, and I was concerned about future reliability and security. I moved to an ordinary kind of Linux system which would be easier to update and extend, using the DietPi distribution, based on Debian, and I used a read-write root filesystem, which also enabled the system to be used as a general-purpose server and workstation. It was no longer just an embedded system for home automation, it was now an intranet hub, running many different services. Everything was started and managed by systemd.
This was quite reliable, but there were a few incidents in which a software update left the system unbootable and required me to retrieve the SD card and repair it with a Linux PC. It turned out that the filesystem had developed a number of errors over the years. I realised that my only ways to recover from this situation were to (1) manually repair it, or (2) restore a backup. Neither was satisfactory, because the root cause of the failure would still exist, and would resurface as a result of a future update, or perhaps a power failure.
This added to another problem which had been bothering me for a while: how to manage the configurations for the machines on the network? I realised that essential configuration settings were distributed across several different machines, and I had no process for managing them centrally. I was afraid that configurations would become desynchronised, particularly if backups needed to be restored.
I found myself thinking of the Raspberry Pi Pico, as used in the ventilation system controller, and wishing that my Raspberry Pi software could be more like that. Pico development normally involves creating a single firmware binary which contains all applications. This is built in a single step, then loaded into Flash, and it is only changed by firmware updates. Configuration is stored separately, for example pico-wifi-settings uses a Flash page near the top end of the memory space. There are various advantages:
- The installed firmware can be verified easily, e.g. by SHA-256.
- The installed firmware always boots up in the same way.
- The configuration can be saved and restored separately from the software - allowing it to kept in version control, with a version history and the ability to restore old versions.
- The firmware is created by a version-controlled build system, so building any version of the system will always be repeatable.
Contrast this with a typical Linux system, where the software is installed piece-by-piece as required:
- Every root filesystem is different. Files managed by the package manager are verifiable but not all files are managed. A SHA-256 of the root filesystem is meaningless.
- Bootup can fail due to root filesystem corruption, or be greatly delayed by a filesystem repair step (e.g. e2fsck).
- Configuration files are found throughout the filesystem even if best practices are rigidly followed (e.g. use of /etc/*.d/ directories).
- The filesystem can be created by a version-controlled build system, as is done when provisioning a machine image for use in a cloud system, but this is not common practice for a workstation-like environments, such as a desktop Linux system or Raspberry Pi.
I decided that I really wanted the advantages of Pico-like development for my home automation system. I looked for a good way to do this. My requirements were:
- A tool which creates a firmware image for the entire system (written to an SD card).
- Update the firmware image via the network.
- All build tools, source code and build configuration are in version control.
- All necessary runtime configuration is in version control and becomes part of the firmware image.
- The system boots up in exactly the same way every time.
- The same system image will be usable in multiple embedded devices, making it easy to share parts of the configuration as required (e.g. lists of MAC addresses to be mapped to specific IP addresses) and avoiding the need to maintain multiple versions.
- The build tools and source code can be updated as necessary to add security patches and new features.
- Any particular installed copy of the firmware can be verified by computing the SHA-256 of the firmware image.
Buildroot already does much of this. Buildroot runs on a workstation (it is not "self-hosting") and builds firmware for various target boards including Raspberry Pi. The plain Buildroot software generates a Linux kernel and root filesystem and populates it with a configured set of packages, plus whatever the user wishes to add to the system. In my case I wanted to add dozens of small services for use on the various Raspberry Pis in my house: some for home automation, others for network services. Buildroot makes many useful packages available by default, and they can be enabled in the configuration. The Python support is excellent with lots of third-party packages available. Everything is built from source code, which can take a while, but the configurability of the system means that the build can be restricted to whatever is actually needed.
Buildroot made the version control requirements quite easy. I was able to create a Git repository for all build scripts and configuration files, and also create an "overlay", which is a directory tree that is merged with the root filesystem produced by Buildroot, adding configuration and application files as required. My existing home automation files had been stored in SVN, though some had moved into Git repositories - I brought all the SVN files together in the new place and linked to the existing Git components as submodules. Buildroot will ignore .git subdirectories when building, so this works pretty well.
Buildroot is also kept updated, with frequent new releases, so security patches are introduced by upgrading to a newer Buildroot version.
Hence, most requirements were already met. Buildroot allows a read-write root filesystem, but this can be disabled in the configuration and the resulting firmware will boot up in the same way every time. It is verifiable by computing the SHA-256 of partitions on the Raspberry Pi, which should be exactly the same as they were when created by Buildroot. If there is a need to store read-write files locally (e.g. log files), an additional partition can be created on the SD card by altering the Buildroot configuration.
Updating the image over the network was an important requirement, but a little tricky, because although the kernel files are only read during boot, the root filesystem can be accessed at any time. Therefore, it's not possible to overwrite the root filesystem with a new copy while the system is running: this will almost certainly cause the system to crash! The safest way to do it might be to remount the filesystem as read-write, "rsync" new files into it, and then reboot. But this would mean that the filesystem on the device would not match the image on the development workstation. It might be equivalent (as in, the same files) but not bit-for-bit identical as required for SHA-256.
At first, I hoped to solve this problem by storing the root filesystem as an initial RAM disk, which is loaded by the bootloader just like the kernel. The initial RAM disk file can be safely replaced while the system is running. However, although Buildroot does support an initial RAM disk, it doesn't have a straightforward way to use it as the root filesystem. Rather, like most Linux distributions, the initial RAM disk is just used as a bootup stage (basically a way to load drivers that are needed before the actual root filesystem can be accessed).
Instead, my solution was to implement A/B system updates by modifying Buildroot's configuration to add two copies of the root filesystem to the SD card image. When the system is running, a firmware update script (Python) determines which partition is currently in use, and then sends the new firmware update to the other. Then, the master boot record is updated to reassign the partition order so that the new firmware will be used on reboot. For example, here is the firmware installed on a 64Gb SD card:
    Disk /dev/mmcblk0: 59 GB, 63864569856 bytes, 124735488 sectors
    1948992 cylinders, 4 heads, 16 sectors/track
    Units: sectors of 1 * 512 = 512 bytes

    Device       Boot   StartLBA     EndLBA    Sectors  Size Id Type
    /dev/mmcblk0p1 *       65536     131039      65504 31.9M  c Win95 FAT32 (LBA)
    /dev/mmcblk0p2 *           8      65511      65504 31.9M  c Win95 FAT32 (LBA)
    /dev/mmcblk0p3        131040  124735487  124604448 59.4G  5 Extended
    /dev/mmcblk0p5        131072    1114079     983008  479M 83 Linux
    /dev/mmcblk0p6       1114112    2097119     983008  479M 83 Linux
    /dev/mmcblk0p7       2097152    4194271    2097120 1023M 83 Linux
Partitions 5 and 6 are copies of the root filesystem, while partitions 1 and 2 are the Raspberry Pi boot filesystem where the kernel is stored. In this example, partitions 1 and 6 are in use: an update would be written to 2 and 5, and then the order of partitions 1 and 2 will be swapped because the Pi bootloader will always start from partition 1. This is the reason why partitions 1 and 2 are not in disk order (an odd number of partition updates has been received since the SD card was initially Flashed).
The final unmet requirement was to use the same firmware on all my Raspberry Pi systems. All I needed was a systemd service that determines which hardware is in use (based on the Ethernet MAC address), and then runs an appropriate "systemd start <variant>.target" command for whichever software variant is required. Each variant has a different systemd target file specifying the list of services which are required for that particular device.
Gradually I rolled out the new firmware for each of my Raspberry Pi devices, adding more variants as necessary. I am glad to have stuck with systemd. Though Buildroot offers SysV-style init scripts as the default, systemd is an option, and it turned out to be very important, because the startup process for some of the variants is pretty complex and systemd provides an easy way to define the rules. systemd also has a great logging system which is very helpful for debugging startup problems - which are reproducible, because the startup process always runs from the same system image.
I learned more about systemd by using it in this way. Two things I didn't know:
- When the system is shut down or rebooted, systemd starts a watchdog timer for the shutdown process. By default, a timeout of 10 minutes is set for the shutdown process. If the shutdown process stops for some reason, the machine will be rebooted anyway after 10 minutes. This time can be configured using RebootWatchdogSec=. If a Pi doesn't seem to be booting up, it may be that actually it is not shutting down.
- The timestamps printed at the beginning of the log are based on systemd's epoch, a time which is normally taken from the timestamp on the NEWS file in the systemd epoch. These times are used until the clock is set - which, on Raspberry Pi, typically happens after systemd has started because the Pi doesn't have its own real-time clock. With systemd-256.7, the apparent initial clock setting is 2025-10-08 16:42:32. This timestamp is retroactively applied to all kernel messages from the beginning of the boot process, making it appear that the kernel started with that clock setting, but in fact it is from systemd, which copies the kernel messages into its own log on startup.
As all Raspberry Pis used the same firmware, I was able to test new Buildroot firmware images on one Pi before rolling it out to the others. I was able to test new configurations by adapting the systemd target files to launch them on my test Pi before sending them to their eventual target. The process worked well: well enough that I set the more ambitious target of using the same firmware on my fibre router. This is a Raspberry Pi CM4 with a Waveshare dual-gigabit Ethernet board.
I was using Raspberry Pi OS Lite on the CM4, and that worked fine, but the kernel created by Buildroot was not able to access the SD card or the Ethernet ports. I needed to debug the startup process with a USB serial adapter attached to header pins 8 and 10, because the CM4 does not have a HDMI port unless the base board provides it, and the Waveshare dual Ethernet board does not have this. I found that the kernel would only boot up to the point where it attempts to mount the root filesystem, and then it would be unable to proceed. It took a while to figure out what was wrong. I solved the problem by firstly rebuilding the Raspberry Pi OS kernel locally, and then adding debug to it (with printk and similar) and then doing a comparison with the Buildroot kernel, also with debug in similar places. Eventually I found that I needed to enable some voltage regulator options in the kernel configuration in order to use the SD card:
    CONFIG_REGULATOR_FIXED_VOLTAGE=y
    CONFIG_REGULATOR_GPIO=y
Enabling Ethernet support was simpler but required a kernel upgrade, as it turned out that the necessary features were not in the mainline Linux kernel used by Buildroot (the bcmgenet driver is missing; Broadcom PCIe support is also required for the second Ethernet port on the Waveshare board). I used the Raspberry Pi kernel fork, setting up Buildroot to use this instead of the default. Various additional options needed to be enabled for the required support:
    CONFIG_PCIE_BRCMSTB=y
    CONFIG_BCM_VCIO=y
    CONFIG_GPIO_BRCMSTB=y
    CONFIG_BCMGENET=y
My requirement to use the same firmware on all devices does create a small inefficiency for the CM4, because the CM4 has 64-bit CPUs (Cortex-A72). Currently, these CPUs are used in 32-bit mode so that the same firmware will be compatible with Raspberry Pi 2. This is likely to be slower. However, the CPUs on the CM4 are never fully loaded, not even when bandwidth use approaches the maximum for the fibre connection. Consequently, I don't think that using 32-bit software is actually a limitation, and using the same firmware is more important to me. (If I updated to a CM5, I would lose this ability, as the ARM Cortex-A76 CPU lacks support for the 32-bit kernel mode: this problem, shared with the Raspberry Pi 5, also prevents booting RISC OS, but no doubt also improves the efficiency of the CPU when running 64-bit code.)
Buildroot's package library had almost everything I required. Apache was available, but not the Apache WSGI module, which I had been using for the intranet applications because WSGI is more efficient than CGI and the applications responded more quickly. This worked fine with DietPi, but Buildroot doesn't include the module and it proved too difficult to cross-compile it. In the end I just used Python's "Simple WSGI Server" instead, dropping Apache entirely.
Another missing feature was the DHCPv6 client. I'd used wide-dhcpv6-client to get the IPv6 subnet prefix for my router (see here) but this didn't have an exact equivalent in Buildroot, odhcp6c didn't work in the same way, and so I couldn't find a way to determine the IPv6 subnet automatically. Cross-compiling wide-dhcpv6-client was difficult (though perhaps not as bad as cross-compiling an Apache module) and after a bit of trouble I gave up. My IPv6 subnet from Aquiss is statically assigned, along with the IPv4 address, so I was able to hardcode the setting into /etc/radvd.conf and everything worked fine. I would need to regenerate the firmware with Buildroot if this address changed, but I am happy with that.
In conclusion: the new system has now been in place for about a month. I have made minor changes to improve logging, and various small tweaks to the intranet services, but no major problems have been seen. The system recovers from reboots and power-cycles effectively, and I feel that I can trust it to operate correctly without maintenance.